
How to Jump Start a Car
Safely revive a dead vehicle battery using jumper cables and a donor car. Master the strict 4-point connection sequence, grounding rules, and battery inspection.
Park the vehicles safely, inspect both batteries, connect positive leads first and negative leads last, following the owner's manual for the correct grounding point. Start the donor vehicle, then the dead vehicle, and disconnect in reverse order.
Watch: How to Jump Start a Car Safely
The exact cable order, what to inspect first, and the mistakes that damage batteries. · 4:42 minute walkthrough. The full written steps are below.
Jump start with a fixed safety sequence
A jump start is simple only when both vehicles are safely positioned and the cable order is controlled. Battery designs and grounding points vary by vehicle.
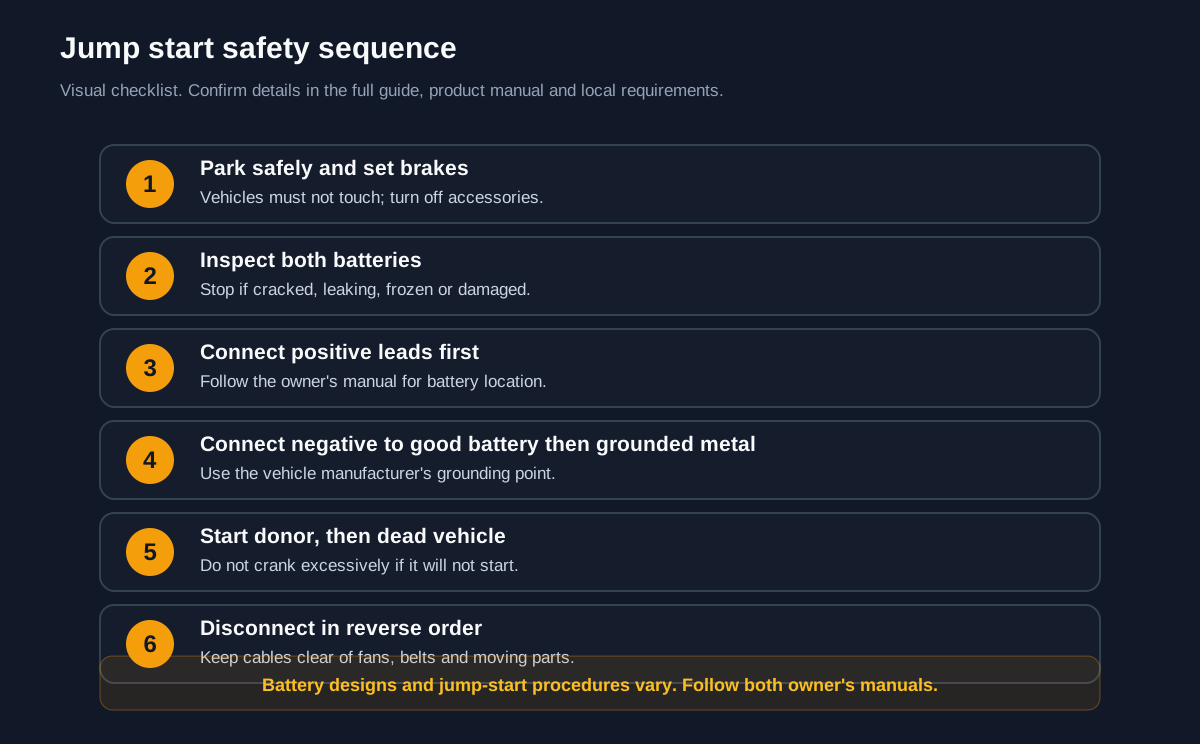
Before you start
- Position the vehicles safely and set the brakes.
- Inspect both batteries before connecting anything.
- Connect positive leads first and negative leads last.
- Disconnect in reverse order and keep cables clear of moving parts.
Common failure points
- Do not jump a cracked, leaking, frozen or visibly damaged battery.
- Do not let the vehicles touch.
- Stop cranking if the engine does not start normally.
Keep learning
- Change a Car BatteryWhen the battery needs replacement instead of a jump.
- Jump Start a Car GuideRead the full step sequence.
- Replace Windshield Wiper BladesAnother basic roadside maintenance task.
Visual step map
See the full sequence before you start, then check off each step as you go.
0 of 8 steps checked
Materials and cost planner
Select the items you plan to buy, adjust any estimated price, and calculate the selected total.
Editable rough U.S. retail estimates. Estimated all listed: $106.00. Prices are planning estimates, not quotes — tax, store, brand, size and quantity will change them.
Time and finish planner
Estimate active working time from the number of steps in this guide.
Trip fuel cost calculator
Estimate fuel cost for a trip using distance, efficiency and current fuel price.
Real-world MPG changes with speed, load, terrain, weather and tire pressure.
- Read the tools, materials, safety notes, and steps below for free.
- Tap See 20-second demo if you want to understand it first.
- Tap Start Camera Coach when you want hands-free help, or Voice-only if you do not want to use the camera.
- Allow camera and microphone. Point your phone at the work; the coach watches your progress and tells you the next step.
🧰 Required Tools & Equipment
- ✓ Heavy-gauge jumper cables (4-6 AWG, minimum 12 feet)
- ✓ Safety glasses with side shields
- ✓ Mechanic work gloves
- ✓ Battery terminal wire brush
- ✓ High-lumen flashlight
📦 Materials & Supplies
- ✓ Clean cotton shop rag
- ✓ Baking soda and water solution (optional, for corrosion)
- ✓ Dielectric grease or petroleum jelly
⚠️ Safety Checkpoints & Warnings
- • Lead-acid batteries vent explosive hydrogen gas; never connect the final clamp to the dead battery's negative post, as the resulting spark can ignite the gas.
- • Inspect the dead battery thoroughly; never attempt to jump a battery that is cracked, bulging, actively leaking acid, or frozen solid.
- • Never allow red and black jumper cable clamps to touch each other while any single clamp is connected to a battery terminal.
- • Ensure both vehicle bodies do not touch each other, emergency brakes are set, and all ignitions and electrical accessories are off before attaching cables.
📋 Step-by-Step Guide (8 Steps)
Position Vehicles and Inspect Battery Condition
Park the donor car with its hood facing the dead car's hood, leaving at least 18 inches of clearance so the metal bodies do not touch. Shift both transmissions into Park (or Neutral for manual transmissions), engage both emergency brakes, and shut off both engines completely. Turn off all headlights, climate control fans, radios, and interior lights in both vehicles. Open both hoods and inspect the dead battery with a flashlight; look for bulging side casings, white or clear frost on the plastic, cracks, or pooled liquid. If the battery is swollen, leaking, or frozen, abort the jump immediately and replace the battery.
- • Both hoods are propped open with a visible physical gap between vehicle bumpers.
- • Dead battery casing shows flat, intact vertical walls with no cracks, pooling fluid, or frost.
- • Allowing the metal bumpers or body panels of the two cars to physically touch.
- • Attempting to jump a frozen or bulging battery, which risks a catastrophic acid explosion.
Clean Battery Terminals and Untangle Cables
Locate the positive (+) and negative (-) terminals on both batteries, wiping off road grime with a clean shop rag. If heavy white, green, or blue crusty corrosion covers the dead battery posts, scrub it away with a terminal wire brush until bare metal is exposed. Uncoil your jumper cables completely and lay them flat on the asphalt between the vehicles. Ensure the red and black clamp pairs on each end are physically separated and not touching each other or any vehicle metal. Put on your safety glasses and gloves before proceeding to physical connections.
- • Lead terminal posts show bright, shiny bare metal contact points free of heavy corrosion.
- • Jumper cables are laid out straight along the ground with jaw clamps spread wide apart.
- • Leaving heavy white oxidation on posts, which acts as an insulator and prevents current flow.
- • Piling tangled jumper clamps on top of the engine bay where they can short out.
Connect Red Clamp to Dead Battery Positive Terminal
Pick up the red clamp on one end of the cable assembly while ensuring the other three clamps remain isolated on the ground. Squeeze the spring clamp open and clamp its copper teeth securely onto the positive (+) post of the dead car's battery. Wiggle the clamp back and forth slightly to bite through any remaining surface oxidation. Ensure the clamp jaws have maximum surface contact and will not slip off under cable tension. Confirm that no part of the red clamp touches any surrounding vehicle chassis metal.
- • Red clamp is firmly clamped around the positive terminal marked '+' on the dead vehicle.
- • Opposite cable clamps remain resting on the ground without touching each other.
- • Connecting to the negative (-) terminal instead of the positive (+) terminal.
- • Letting the loose clamps at the other end touch vehicle metal while attaching the first clamp.
Connect Red Clamp to Donor Battery Positive Terminal
Walk to the donor vehicle carrying the remaining red clamp, keeping the adjacent black clamp held away from the car body. Squeeze the red clamp and seat its teeth firmly onto the positive (+) terminal of the donor car's battery. Twist slightly to ensure a deep mechanical bite into the lead post. Visually verify once more that both red clamps are now attached exclusively to positive (+) battery posts. Confirm the two remaining black clamps are still completely separate and suspended or grounded safely away from positive points.
- • Both positive terminals across both vehicles have red clamps securely attached.
- • Both black clamps remain completely unattached and separated from each other.
- • Accidentally brushing the second red clamp against the donor vehicle's metal frame or radiator core support.
- • Attaching the clamp onto plastic terminal shrouds rather than bare lead.
Connect Black Clamp to Donor Battery Negative Terminal
Take the black clamp on the donor car's side of the cable harness. Attach this black clamp firmly to the negative (-) terminal post of the donor vehicle's battery. Squeeze the jaws hard to ensure solid mechanical contact on the lead lug. Check that the cable runs smoothly without tangling near engine accessory drive belts or the radiator cooling fan. You now have three clamps connected: two red on positive posts, and one black on the donor negative post.
- • Donor battery has both red (+) and black (-) clamps securely attached to their respective posts.
- • Final remaining black clamp is held isolated in hand, clear of all engine components.
- • Connecting the black clamp to the positive terminal of the donor car.
- • Draping the black cable across cooling fan blades or accessory belt pulleys.
Connect Final Black Clamp to Dead Vehicle Engine Ground
Walk to the dead vehicle with the final black clamp. DO NOT attach this clamp to the dead battery's negative post. Instead, locate an unpainted, solid metal structural point on the dead vehicle's engine block, such as an unpainted alternator bracket, engine lifting eye, or bare metal chassis ground bolt at least 18 inches away from the battery. Clamp firmly onto this bare metal ground point. Expect a minor, harmless spark upon connection as the circuit completes; this grounding location ensures the spark occurs far from venting hydrogen gas.
- • Final black clamp is attached to a solid unpainted engine bracket or unpainted chassis bolt.
- • Dead battery negative (-) post is completely bare and untouched by any clamp.
- • Attaching the final black clamp directly to the dead battery's negative terminal post.
- • Clamping onto painted brackets, plastic engine covers, or fuel system lines.
Start Donor Vehicle, Charge, and Crank Dead Vehicle
Start the donor vehicle's engine and let it idle smoothly. Lightly press the donor car's accelerator to hold engine speed around 1,500 to 2,000 RPM, allowing its alternator to charge the dead battery for 3 to 5 full minutes. Keep hands, clothing, and cables completely clear of all spinning pulleys, belts, and electric cooling fans. After 5 minutes of charging, attempt to start the dead vehicle by turning the ignition key or pressing the start button. Crank the dead engine for no more than 5 seconds; if it starts, let both vehicles idle together for 2 minutes.
- • Donor vehicle is running smoothly at elevated idle.
- • Dead vehicle engine cranks vigorously, fires up, and settles into a stable idle.
- • Attempting to crank the dead vehicle the exact split-second the cables are attached without letting the donor alternator charge it first.
- • Continuous cranking for more than 10 seconds, which overheats the starter motor.
Disconnect Cables in Exact Reverse Order
With both engines running, disconnect the jumper cables in the exact reverse order of attachment to prevent short-circuits and sparks near batteries. First, remove the black negative clamp from the engine ground of the newly started vehicle. Second, remove the black negative clamp from the donor battery post. Third, remove the red positive clamp from the donor battery post. Finally, remove the red positive clamp from the newly started vehicle's positive post, and coil the cables for storage.
- • All four clamps are completely removed and separated in hands/ground.
- • Both vehicles remain idling with battery terminal covers snapped back into closed positions.
- • Removing positive clamps first, creating an immediate live short risk against the chassis.
- • Allowing the freed clamps to touch each other while remaining clamps are still hooked up.
Don’t have everything?
- No Jumper cables and donor vehicle? Portable lithium-ion jump starter pack rated for vehicle engine displacement
- No Battery terminal wire brush? Medium-grit emery cloth or a dry Scotch-Brite scouring pad
- No High-lumen flashlight? Secured smartphone flashlight angled directly at terminal posts
Frequently asked questions
What order do you connect jumper cables?
Connect positive to positive first, then connect the second negative lead to the good battery and the final lead to the vehicle manufacturer's grounding point. Follow both owner's manuals.
Can I jump start a damaged battery?
No. Do not attempt a jump start if a battery is cracked, leaking, frozen or visibly damaged.
How long should I wait before starting the dead car?
Run the donor vehicle for a few minutes according to its owner's manual, then try to start the dead vehicle without excessive cranking.
Why does the car still not start after a jump?
The battery may be failed, the cables may not have a good connection, or there may be another starting-system problem. Stop cranking and get help.